Programming Poppy robots in Python 3
This chapter will guide you through how to control Poppy robots in Python 3. As it is actually the language used for writing Poppy core libraries, you will see how to access all the different levels of control, from the higher to the lower.
We will detail everything you need to know to directly program you robot using the Python embedded in the Poppy robot or to install everything locally. Note that this chapter does not intend to teach you Python or programming from scratch and thus if you are completely new to Python it may be good to start with a Python tutorial. Yet, we try to keep the tutorials as simple as possible and we will always warn you when some parts are targeting more advanced users.
We will try to provide as many examples as possible and point to the complete API so you can find and use the least famous features. Most of the examples and tutorials are available as a collection of Jupyter notebooks. The next chapter, Jupyter Notebooks Gallery, presents a list describing each notebook, what they will teach, what they can be used for, for which robot, etc.
All Poppy libraries are open source and are released under the GPL v3 license. So you can freely access the source code on github. Do not hesitate to fork them, send pull request and contribute!
Why Python?
The libraries developed for the Poppy project were designed with the aim to make it easy and fast to write code for controlling various robots based on - originally - robotis dynamixel motors. The idea was to provide access from the lower level - raw serial communication with a specific motor for instance - to higher levels such as starting and stopping primitives/behaviors (e.g. face tracking, postures, ...) or directly recording motions through learning by demonstration.
We decided to write most of them in Python as its flexibility allows for fast and modular development. It was also meant to be accessible by a large audience, from developers and roboticists in general, to hobbyists, researchers, artists... Python was also chosen for the tremendous pools of existing libraries (scientific, computer vision, IO, web...) so if one is interested in adding a new feature, such as support for a new motor/sensor, it should be as easy and fast as possible.
Finally, support for multiplatforms and ease of installation were also key aspects.
Overview of the different libraries
A more detailled documentation of these software libraries is available in the software libraries section
Before jumping into the code, we will briefly introduce the different existing Poppy libraries and how they interact with each other.
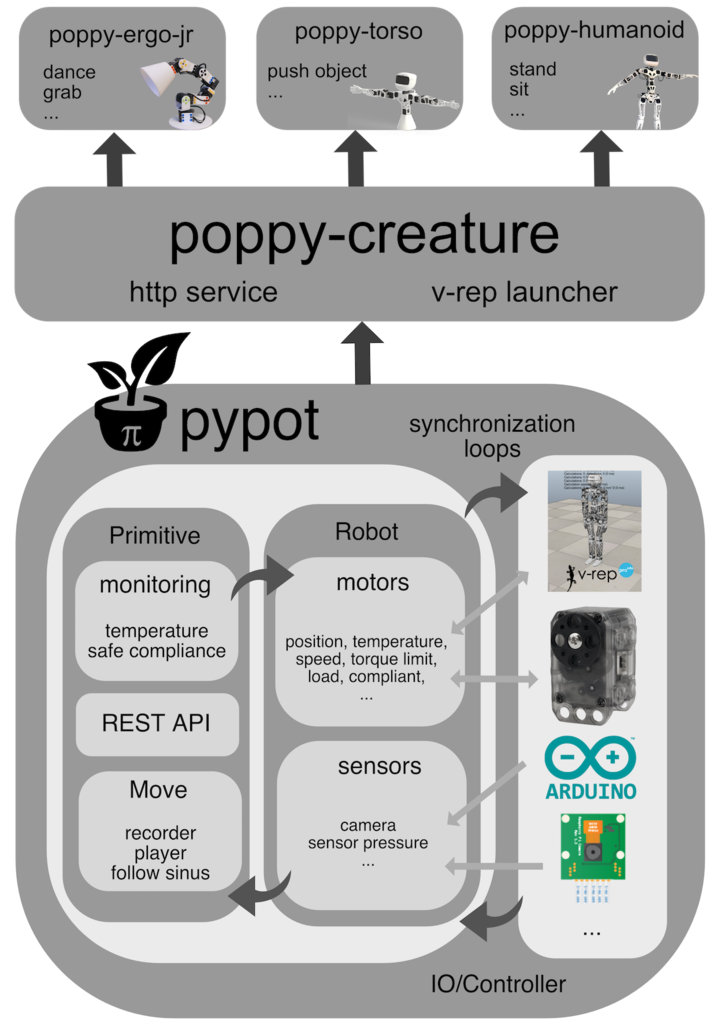
They are three main library levels:
pypot: This is the core of the Poppy software architecture. Pypot handles all the low level communication with the hardware (both sensors and motors), defines synchronization loops so your command are always up to date. It also provides the primitives mechanism which allows the definition of simple behavior that can be - more of less - automatically combined.
poppy-creature: This library defines the common tools shared by all Poppy robots, for instance how to automatically launch the simulator or start the HTTP API attached to any robot.
poppy-ergo-jr, poppy-torso, and poppy-humanoid: Those libraries are specific to their respective Poppy robot. They define the particular configuration of the robot, the sensors it uses, which motors are connected to which buses... This is also were behaviors specific to a creature are defined (the stand primitive for the humanoid for instance).
This is summarized in the diagram below:
Installation
First, note that if you are only planning to use real robots, they already come with Python and all Poppy libraries installed. You can directly connect to the Jupyter notebook server via the web interface and have nothing to install on your machine!
What you need to install is summarized in the diagram below:
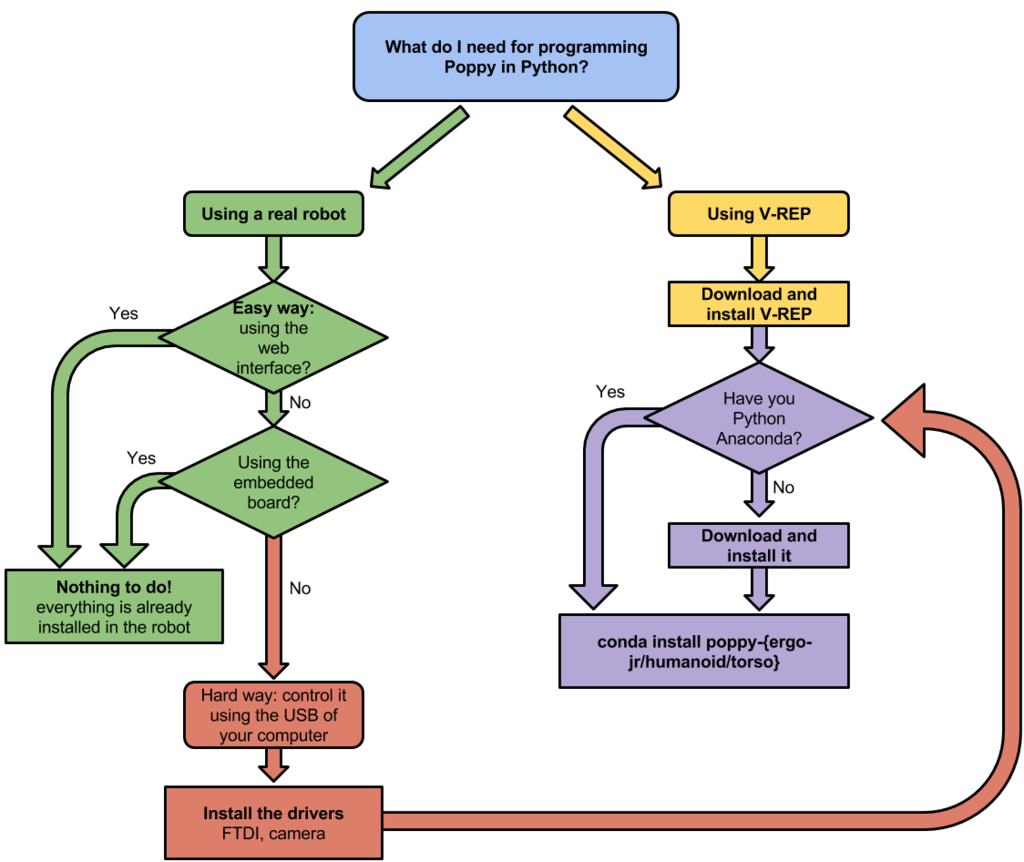
Yet, if you are planning to either
- Use a simulator (e.g. CoppeliaSim, or web simulator),
- or want to directly plug the robot to your computer
You will have to install Poppy libraries locally. They work on Windows, Mac OSX, Linux, and have been tested on Python >= 3.5. Python 2 and Anaconda recipes are no longer supported starting from pypot >= 4.0.
Also note that if you are planning to directly plug your robot to your USB port, specific drivers should be installed.
All steps are detailed in the chapter install Poppy software.
Quickstart: Hello Poppy world!
To give you a rapid overview of what you can do using Python to program Poppy robots, this section will show you how to:
- Create and connect your robot
- Retrieve values from the sensor and send motor commands
- Start playing with primitive by recording motions by demonstration
This section does not intend to cover everything that can be done in Python with Poppy but to give you sneak peaks of the most common features. For more advanced use, you should refer to the next section where we present a list of Jupyter notebooks each detailing a specific aspect or feature.
In the following examples, we assume that you have a working environment meaning that you either:
- are using the Python embedded in your robot: through the Jupyter Notebook server,
- or you have installed everything locally to work with a simulator.
Create and connect to a Poppy robot
Import the library
The very first step you have to do to start programming Poppy robots in Python is to import the library. In Python they are called module or package.
To do that, you write something similar to:
from pypot.creatures import *
This will actually import all Poppy robots installed on the Python distribution you are using. If you want to use a specific robot, you can replace the * (which means all here) by the name of the robot you want.
For the ErgoJr:
from pypot.creatures import PoppyErgoJr
For the Torso:
from pypot.creatures import PoppyTorso
For the Humanoid:
from pypot.creatures import PoppyHumanoid
If you see an error similar to the one below when executing the previous line, this means that the libraries are not correctly installed. See the section install Poppy software.
In [1]: from pypot.creatures import PoppyHumanoid
ImportError Traceback (most recent call last)
<ipython-input-1-18e4c5a36525> in <module>()
----> 1 from pypot.creatures import PoppyHumanoid

ImportError: cannot import name PoppyHumanoid
Create the Robot object - with a real robot
Then, you can actually create the Python object that will represent your robot. Depending on the Poppy robot you are using:
# if you are using an Ergo Jr
poppy = PoppyErgoJr()
or
# if you are using a Torso
poppy = PoppyTorso()
or
# if you are using a Humanoid
poppy = PoppyHumanoid()
And that's it, if you did not see any error message it means that you are connected to your robot. If you see an exception like the one shown below, you should check the wire connection and try again:
IOError: Connection to the robot failed! No suitable port found for ids [3, 5, 7, 11, 13, 17]. These ids are missing [3, 5, 7, 11, 13, 17] !
Create the Robot object - with CoppeliaSim
To use a simulated robot instead of a real one, you only have to specify it when creating the Robot object. For instance, if you want to create a simulated Poppy Torso, you simply have to execute the following line:
poppy = PoppyTorso(simulator='vrep')
All three Poppy robots - Humanoid, Torso, and Ergo Jr - can be used with CoppeliaSim.
If you see an error message like this, check that you have launched CoppeliaSim and that you have close the popup in CoppeliaSim (see this chapter for details).
IOError: Connection to CoppeliaSim failed!
Create the Robot object - with web simulator
Currently only the Ergo Jr is usable within the web simulator. It also requires specific versions of libraries to be used properly.
To make sure you meet these requirements, you can type this command from your shell:
pip install pypot>=2.12 poppy-creature>=1.8 poppy-ergo-jr>=1.6 --upgrade
You can then instantiate the poppy-ergo-jr creature:
poppy-services --poppy-simu --snap --no-browser poppy-ergo-jr
This will create a server for Snap! on port 6969, and a server for the visualizer on port 8080.
You can then head to the visualizer page.
Access the sensors and motors
The robot object you just created contains two main groups of objects:
- motors
- sensors
that can be easily access using poppy.motors and poppy.sensors. As soon as the robot object is created it automatically starts synchronization loops which will ensure that the last available value are received/sent to the robot.
Servomotors that are used in Poppy robots can be seen as both motors and sensors. Indeed, on top of being "simple" motors, they also provide multiple sensing information: their current position, speed and load but also their temperature, the current used... Yet, for simplification they are only available under the motor category.
Get data from your robot
Now that you have created your robot object, you can directly use Python to discover which motors are attached.
In all examples below the results are shown for an ErgoJr. If you are using a Torso or a Humanoid you will see more motors with different names.
For instance, to know how many motors your robot have you can execute:
print(len(poppy.motors))
poppy.motors is actually a list of all motors connected to your robot. Thus, if you want to get the present position of all motors, you can do:
for m in poppy.motors:
    print(m.present_position)
Of course, you can also access a specific motor. To do that, you need to know the name for the motor you want to access. You can find this list in the assembly documentation of your robot.
You can also get a list of all motors name directly from python:
for m in poppy.motors:
    print(m.name)
or using a motor pythonic expression:
print([m.name for m in poppy.motors])
Then you can directly access the desired motor by its name:
m = poppy.m3
or get its position:
print(poppy.m3.present_position)
The most common values for motors are:
- present_position
- present_speed
- present_load
Similarly, you can get data from your sensors. Depending on the Poppy robot you have different sensors available. You can get the list of all sensors in the exact same way you did for motors:
print([s.name for s in poppy.sensors])
And then access a specific sensors by its name. For instance, to get an image from the camera of the Ergo Jr:
img = poppy.camera.frame
This section just presented some of the available values that you can get from your motors/sensors. They are many other - some are specific to a particular robot - we will present them through the different notebooks.
Send motor commands
Now that we have shown you how to read values from your robot, it is time to learn how to make it move!
This is actually really similar to what you have just seen. Instead of getting the present_position of a motor you simply have to set its goal_position.
But first, you have to make sure your motor is stiff, meaning that you cannot move it by hand. To do that we will turn off its compliancy. Assuming you have an Ergo Jr and want to make the motor m3 moves - feel free to use any other motor but make sure the motor can freely move without hurting any of your finger:
poppy.m3.compliant = False
The motor should now be stiff. And then, to make it move to its zero position:
poppy.m3.goal_position = 0
Note: present_position and goal_position are actually two different registers. The first refers to the current position of the motor (read only) while the second corresponds to the target position you want your robot to reach. Thus, they can have different values while the motor is still moving to reach its goal_position.
As a slightly more complex example we will make it go to 30 degrees then -30° three times:
import time

for _ in range(3):
    poppy.m3.goal_position = 30
    time.sleep(0.5)
    poppy.m3.goal_position = -30
    time.sleep(0.5)
Note that after each new value set to goal_position we wait so the motor has enough time to actually reach this new position. Another way to do the same thing is to use the goto_position method:
import time

for _ in range(3):
    poppy.m3.goto_position(30, 0.5, wait=True)
    poppy.m3.goto_position(-30, 0.5, wait=True)
As you can see, this method takes three arguments, the target position, the duration of the move and whether to wait or not the end of the motion.
If you want to move multiple motors at the same time, you can simply do something like:
for _ in range(3):
    poppy.m1.goal_position = -20
    poppy.m3.goal_position = 30
    time.sleep(0.5)
    poppy.m1.goal_position = 20
    poppy.m3.goal_position = -30
    time.sleep(0.5)
or use a python dictionary storing the target position per motor you want to move, that can be given to the goto_position method:
pos_1 = {'m1': -20, 'm3': 30}
pos_2 = {'m1': 20, 'm3': -30}

for _ in range(3):
    poppy.goto_position(pos_1, 0.5, wait=True)
    poppy.goto_position(pos_2, 0.5, wait=True)
You can turn a motor back to its compliant mode (where you can freely move it) by setting its compliant register to True:
poppy.m3.compliant = True
Record and play motion by demonstration using primitives
Pypot provides you with the primitive mechanism, which are simply pre-defined behaviors that can be attached to your robot. In this section, we will show you how to use some primitives already existing for recording and playing motions. You can also define your own primitive but this is out of the scope of this section, you will find details on how to do this in dedicated notebooks.
Record a motion by demonstration
Designing choreographies for your robot using goal_position or goto_position can be long and kind of troublesome. Fortunately, there is a much more efficient way of doing this: recording motions by directly demonstrating the move on the robot.
This can be summarized into few steps:
- make the robot compliant so you can move it by hand
- start the recording
- actually moves the robot so it follows whatever move/choreography you can think of
- stop the recording
And now to do that in Python:
So, first we turn all motors of the robot compliants:
for m in poppy.motors:
    m.compliant = True
You can also record a movement with motors stiff (
compliant = False), and moving them with goal_position or goto_position commands.
Then, we have to include the primitive used for recording motion:
from pypot.primitive.move import MoveRecorder
To create this primitive, you have to give the following arguments:
- on which robot you want to use this primitive (this can be useful if you are working with multiple robot at a time - for instance you can record a move on a robot and at the same time make it reproduce by another one.
- the record frequency of the move you want to register: how many position per second will be recorded - the higher the more accurate the record will be but also more data will have to be processed - good values are usually between 10Hz and 50Hz.
- the motors that you want to record. you can record a move on a subpart of you robot, for instance only on the left arm.
Here, we will record a move on the whole robot at 50Hz:
record = MoveRecorder(poppy, 50, poppy.motors)
We used poppy.motors to specify that we want all motors if you only want let's say the two first motors of an Ergo Jr you could have used [poppy.m1, poppy.m2] instead.
Now it is time to record. As it can be hard to both move the robot and type Python command at the same time, we will make a small script, that:
- wait 5s so you can get ready to record
- start the record
- record for 10 seconds
- stop the records
import time

# Give you time to get ready
print('Get ready to record a move...')
time.sleep(5)

# Start the record
record.start()
print('Now recording !')

# Wait for 10s so you can record what you want
time.sleep(10)

# Stop the record
print('The record is over!')
record.stop()
Now, you should have a move recorded. You can retrieve it from the recorder primitive:
my_recorded_move = record.move
and check how many positions where recorded:
print(len(my_recorded_move.positions()))
Replay recorded moves
Now to play back recorded motions you have to use another primitive: MovePlayer
from pypot.primitive.move import MovePlayer

player = MovePlayer(poppy, my_recorded_move)
As you can see, to create it you have to specify the robot (as for the MoveRecorder) and the move you want to play.
Automatically all recorded motors become stiff to be able to play the move.
Then, you can simply start the replay:
player.start()
And if you want to play it three times in a row:
for _ in range(3):
    player.start()
    player.wait_to_stop()
We use the wait_to_stop method to make sure we wait for the first move to finish before we start another. By default, playing a move we will not block to allow you to play multiple move in parallel.
Write a simple sensori-motor loop
Robotic is all about sensori-motor loops, meaning that motor commands will be more or less directly related to the sensor readings. In other terms the robot actions will be determined by what it perceives from its environment.
Poppy libraries and more particularly pypot provides you with tools to easily write sensori-motor loops. We will show here a very simple example where some motor of an Ergo Jr will be controlled by the position of other motors in order to keep the head of the Ergo Jr straight.
To do that, we will free the two first motors, so they can be moved by hand. Two other motors will try to lively compensate the motion applied on the free motors.
We need few simple steps:
- read values from sensors (here the two free motors)
- compute command from those readings
- set new motor command
- go back to step 1.
This example is designed for the Ergo Jr. It could be adapted to other Poppy robots, by changing the motors used. Yet, it is not that obvious which one to use to have a "cool" result.
Demo version
Before writing the sensori-motor loop, we will first set the Ergo Jr in a base position.
from pypot.creatures import PoppyErgoJr

jr = PoppyErgoJr()

jr.goto_position({'m1': 0.,
                  'm2': -60.,
                  'm3': 55.,
                  'm4': 0.,
                  'm5': -55.,
                  'm6': 60.}, 2., wait=True)
Then, we make sure the moving speed of the motors are not too high to prevent shaky motions:
for m in jr.motors:
    m.moving_speed = 250
Finally, we free the two first motors:
jr.m1.compliant = True
jr.m2.compliant = True
Now, that everything is setup we write our very simple sensori-motor loop like this:
import time

while True:
    # Step 1
    p1 = jr.m1.present_position
    p2 = jr.m2.present_position

    # Step 2
    g1 = -p1
    g2 = -p2

    # Step 3
    jr.m4.goal_position = g1
    jr.m6.goal_position = g2

    time.sleep(.02)
- Step 1: As you can see, here our readings step is simply to retrieve the present_position of the motors m1 and m2.
- Step 2: Here, we defined the base position so the motors m1/m4 and m2/m6 are parallel. Thus, to compensate the head position, we simply have to define the new motor goal position as the opposite of the read present position.
- Step 3: We simply set the goal position as the just computed command
Those steps are included inside an infinite loop - with a time.sleep to avoid CPU overhead.
To stop this while True loop, you will have to use the classical Ctrl-c, or use the stop button if you are running it through Jupyter.
Now with a primitive
But what about if you want to make this behavior an independent "brick" that you can start/stop on demand combine with other behaviors. Well, primitives are meant to do just that.
There is two main types of primitive: Primitive and LoopPrimitive. The first one basically gives you access to just a run method where you can do everything you want on a robot. The second one as the name indicates is an infinite loop which calls an update method at a pre-defined frequency. In our case it is the more suited one.
Here is the entire definition of this primitive:
class KeepYourHeadStraight(LoopPrimitive):
    def setup(self):
        for m in self.robot.motors:
            m.compliant = False

        self.robot.goto_position({'m1': 0.,
                                  'm2': -60.,
                                  'm3': 55.,
                                  'm4': 0.,
                                  'm5': -55.,
                                  'm6': 60.}, 2., wait=True)

        for m in self.robot.motors:
            m.moving_speed = 250

        self.robot.m1.compliant = True
        self.robot.m2.compliant = True

    def update(self):
        self.robot.m4.goal_position = -self.robot.m1.present_position
        self.robot.m6.goal_position = -self.robot.m2.present_position
As you can see, there is two main parts. The setup method which defines what needs to be done to prepare the robot before starting the behavior - here simply puts it in its base position and turn on the compliance for the two first motors.
And the update method which will be regularly called: here is where we put the actual code for the sensori-motor loop: reading sensor - computing the new command - and sending the new command to the motors.
Now that we have defined our primitive, we can instantiate it and start it:
# we specify we want the primitive to apply on the jr robot instance
# and that the update method should be called at 50Hz
head_straight = KeepYourHeadStraight(jr, 50.0)

head_straight.start()
You can stop it whenever you want:
head_straight.stop()
And re-starting it again...
head_straight.start()
The huge advantage of using a primitive in this case is that after starting it, you can still easily run any other codes that you want. The primitive starts its own thread and thus runs in background without blocking the execution of the rest of the code.