Flash a SD card with the Poppy operating system
This chapter is only for people who want to control a tangible robot. If you intend to control a simulated robot on your computer, look at the simulation install path.
Poppy creatures are controlled by a small embedded computer: a Raspberry Pi or an Odroid board.
The operating system of this computer is hosted on a SD card (you can also use an MMC for the Odroid).
You may be in 2 cases:
- You already have a SD card flashed with the Poppy operating system (provided by one of the Poppy distributors for example). You can skip this tutorial and you are ready to go to the assembly section.
- You have an empty SD card, or your software is outdated and requires to be upgrade ; so you have to download and write the operating system on the SD card by following the current tutorial.
You will need a computer with a SD card reader to write the image on the SD card.
1. Download the image of the operating system
First, choose the latest version of the software image to download depending on your Poppy creature and the targeted board, in the Assets section:
If you don't know which files is the right file at this step, keep in mind that software images are .img.zip or .img.7z files.
2. Extract the archive
The file you have downloaded is an archive (in format zip or 7z) of a Poppy software image. The file is probably in the Downloads folder of your computer, but it can be anywhere except on a FAT32 drive, that would cause errors during extracting. Extract the archive before continuing: something like right click on the file > Extract here is very fine.
3. Write the operating system image to the SD card
With the image file corresponding to your Poppy creature, you need to use an image writing tool to install it on your SD card. There are 2 ways to do this, but we recommand Option A for most users.
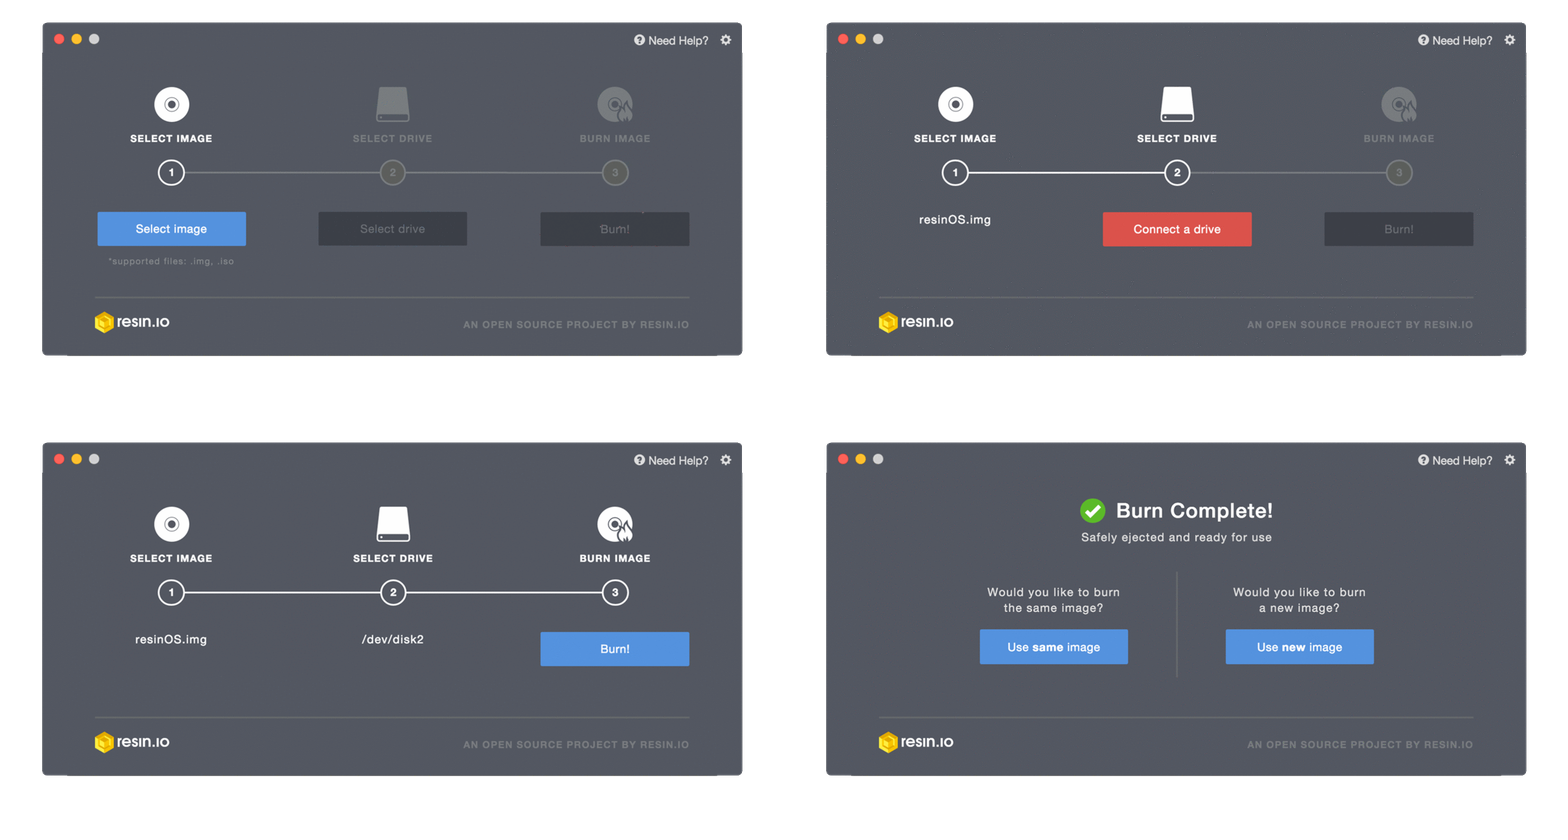
3. Option A: Burn the image with Etcher (GUI software, easiest option)
- Download and install Etcher. It works for Windows (versions above Windows 7), OSX, and GNU/Linux operating systems.

- Insert the SD card into your computer.
- Start Etcher
- Select the SD card drive
- Select the uncompressed image ending with
.img(a file like2020-10-23-poppy-ergo-jr.img). - Start flashing. The image written to your card will be verified afterwards.
If there is no error, your SD card is ready. You can now assemble your robot!
3. Option B: Burn the image with dd (CLI software, for advanced users)
This method works only for GNU/Linux and OSX operating systems, and is not recommended if you don't understand what you do.
Insert the SD card and look for where your disk is mounted (/dev/mmcblk0 and /dev/disk2 for the following example). Adapt and execute one on these commands. Be careful, you could erase one of your primary disk partition if you don't understand what you do.
If you are on a GNU/Linux OS:
sudo dd bs=1M status=progress if=poppy-ergojr.img of=/dev/mmcblk0
If you are running OSX or another BSD based OS:
sudo dd bs=1M status=progress if=poppy-ergojr.img of=/dev/rdisk2
Run
sync; this will ensure the write cache is flushed and that it is safe to unmount your SD card.Remove the SD card from the card reader.
If there is no error, your SD card is ready. You can now assemble your robot!